Wow! Strings
Convert any image into string art scheme to create a stunning DIY artwork out of nails and strings.
✉ info@wowstrings.com
This is a short step by step demonstration of how to make a string art picture on your own.
First, create a string art scheme based on your favorite image with WowStrings.com string art generator, and print it out.
Also, prepare a square white board, a black thread, 240 nails, a scissor, and a hummer.

For exceptional string art that truly stands out, we recommend our professional-grade nylon monofilament thread. Each spool gives you a massive 5000 yards, ensuring you have enough material for even your most ambitious projects.
This thread is the perfect choice for artists because it combines incredible strength with a remarkably fine thickness. Its subtle sheen and semi-transparent quality allow the threads to blend seamlessly where they overlap. This creates smooth color transitions and gentle shadows, giving your finished piece a soft, photorealistic depth that thicker threads simply cannot achieve.

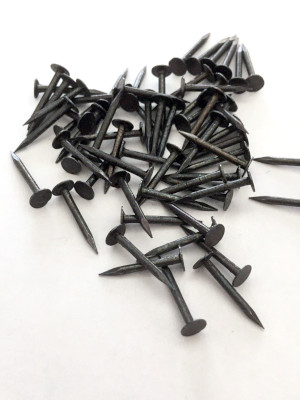
For a flawless finish, we recommend using nails with a wide, decorative head.
Their broad surface securely holds the thread in place, preventing slipping and ensuring your design remains perfect for years to come.
These elegant nails, available in classic black or sleek nickel-plated finishes, also add a beautiful polished look to your artwork.
A nail length of up to 2 cm provides the ideal balance of a secure hold and a neat, professional profile.
Print out the page with nail positions template in big format in any printing shop.

Attach the template to the board, and cut out the unused area outside the circle.

Find the middle of the board side, and place the nail #181 in that point.
Adjust the template to make padding equal on all four sides.
Fix the template with four nails.

Then, drive in the rest of the nails.

Cut out the unused area inside the circle.
Make many radial cuts to be able to easily remove the paper once the artwork is ready.

Attach the thread to the first nail.

Wrap the thread around nails according to the provided number sequence.

Once the artwork is ready, remove the paper.

Enjoy.
